Installing Ferret on Windows 10
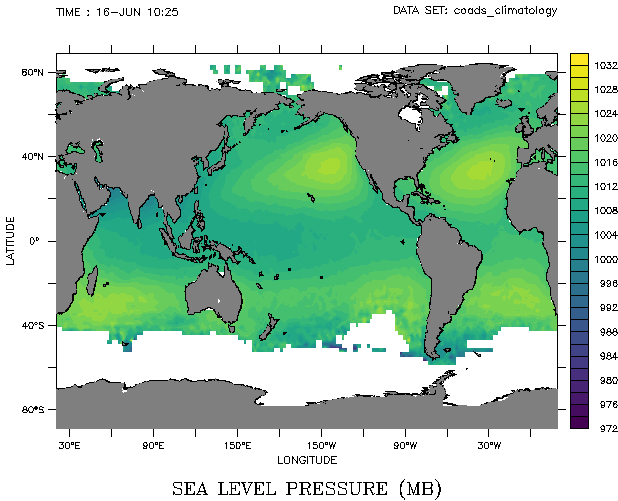
Data from numerical models or observational platforms like satellite are usually gridded and multi-dimensional. With traditional programming languages like Python and Fortran, you need to write a code of about 15-20 lines long to just visualize the data. However, Ferret, which is an interactive visualization and analysis tool who loves handling gridded geographical data, can plot spatial map of a variable along with proper coastlines and land/ocean mask in about 4-6 lines of code. The following code plots the climatological Sea Level Pressure during the month of June.
NOAA/PMEL TMAP
FERRET v7.5 (optimized)
Linux 2.6.32-754.11.1.el6.x86_64 64-bit - 04/25/19
15-Aug-19 13:17
fjnl/ferret.jnl.~4~
yes? use coads_climatology
yes? sh da
currently SET data sets:
1> /home/lijo/ferret/FerretDatasets-7.4/data/coads_climatology.cdf  (default)
name     title                             I         J         K         L
SST      SEA SURFACE TEMPERATURE          1:180     1:90      ...       1:12
AIRT     AIR TEMPERATURE                  1:180     1:90      ...       1:12
SPEH     SPECIFIC HUMIDITY                1:180     1:90      ...       1:12
WSPD     WIND SPEED                       1:180     1:90      ...       1:12
UWND     ZONAL WIND                       1:180     1:90      ...       1:12
VWND     MERIDIONAL WIND                  1:180     1:90      ...       1:12
SLP      SEA LEVEL PRESSURE               1:180     1:90      ...       1:12
yes? fill/l=6 slp
yes? go land 7
yes? go fland  5
Output from above 5 lines of code:

However, Ferret only works in Unix and Mac based systems. So if you are on a Windows machine and want to use Ferret, you are limited to two options: either dual boot your system with a Linux distro like Ubuntu or install a Virtual Machine. Lucky for us, there is now a third and better option, which is to install Ubuntu (or any Unix system) as a Windows app. Bash is now supported in Windows since the roll out of Windows 10 Anniversary update in 2016. They call it Windows Subsystem for Linux (WSL). Once you set-up WSL, you can use almost any Linux supported application like Ferret through the Ubuntu (or any other distro available in Microsoft Store) app.
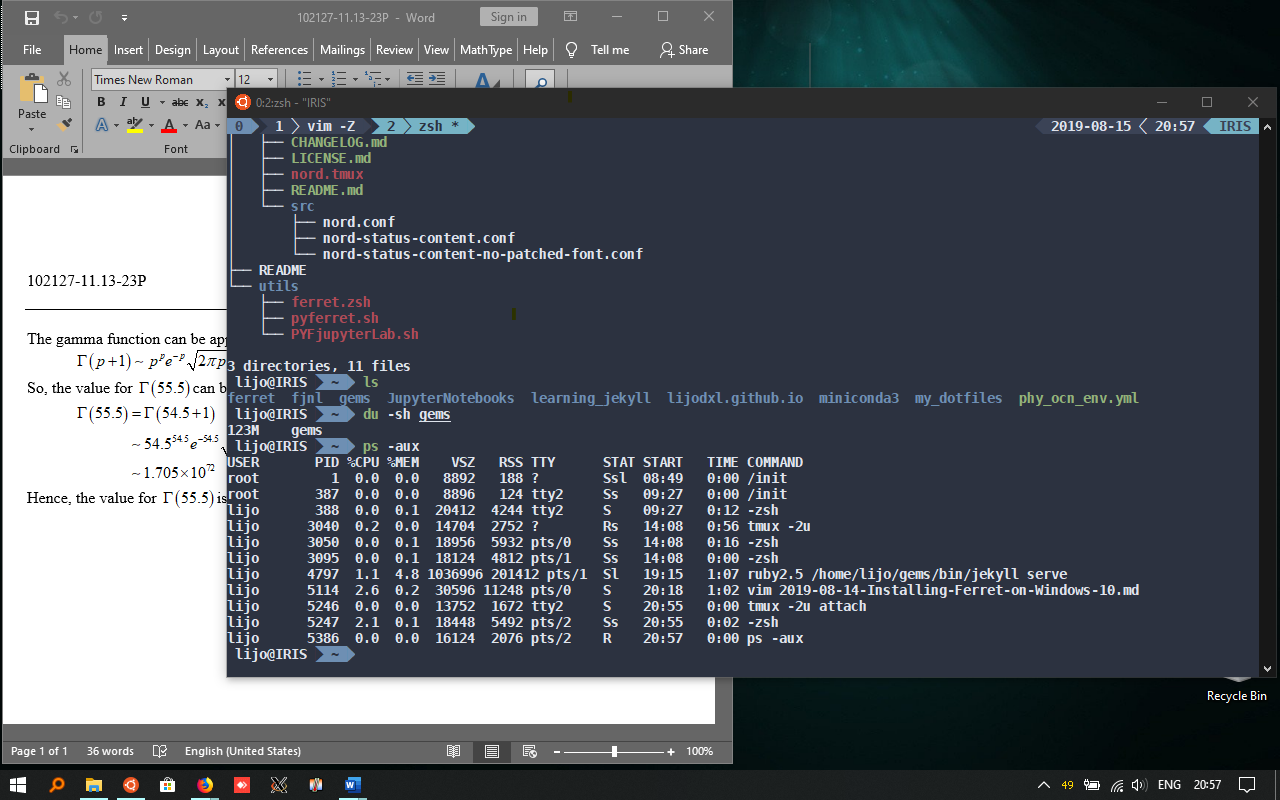
Here’s a preview:
 accessing Ubuntu terminal in Windows 10
Set up WSL and install Ubuntu
Before you begin, make sure your Windows is updated. Also note that this feature only works with 64-bit version of Windows 10. A quick rundown of steps is given here, however, a much more detailed instruction with pictures can be found in How-To Geek’s website.
- Step 1: Navigate to
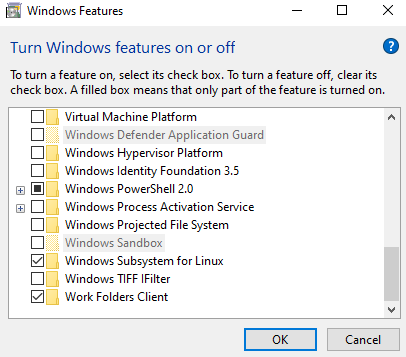
Turn Windows feature on or offoption by typing “windows feature” in the start menu. -
Step 2: Scroll down in the new window to find
Windows Subsystem for Linuxfeature and put a tick against it as shown below:
- Step 3: Allow your computer to restart.
- Step 4: After the restart open Microsoft Store app and search for “Ubuntu”.
-
Step 5: Select the version you want to install and press
Getfollowed byInstall.Not sure which version to install? Go with the one without any version number. This will install the latest stable version of Ubuntu available.
- Step 6: Once the installation is complete, find the Ubuntu app you just installed in the start menu.
-
Step 8: Open the app and follow the instructions. Enter username and password when prompted (you can use any username and password and remember it for later use)
Note: The password you type won’t be made visible on the screen for security reasons. Keep typing and press enter when done.
- Step 9: Type
sudo apt update && sudo apt upgradein the Ubuntu terminal to install any pending updates for Ubuntu. (sudo commands will ask you to enter a password. Use the same password set in previous step)
Great Job! You now have a working Ubuntu installed as a Windows app. Anytime you need troubleshooting the system, remember to add the keyword WSL to find solutions specific for Ubuntu installed in Windows.
Install Ferret
Now that you have linux in your system, proceed to install Ferret.
- Step 1: Download the
Ferret-x.x.x-RHEL7-64.tar.gz(x.x.x corresponds to latest version available at the time) file from Ferret github Release page. - Step 2: You need to download the ferret_dataset to get coastlines and land/ocean mask working. Bathymetry and standard climatological data like levitus and codas are also included in this dataset. (Choose the latest “source code (tar.gz)” version from the link)
-
Step 3: If you closed Ubuntu, open it again by going to the start menu. Make a new directory with name
ferretin Ubuntu’s home directory. Move the files you downloaded to this directory and untar them. To do so, you can copy paste the following commands one by one in your Ubuntu terminal.(assuming you downloaded the files to your Windows Downloads folder):mkdir ferret cd ferret mv /mnt/c/Users/your_windows_username/Downloads/Ferret-*-RHEL7-64.tar.gz . mv /mnt/c/Users/your_windows_username/Downloads/FerretDatasets*-64.tar.gz . tar -xvf Ferret-*-RHEL7-64.tar.gz tar -xvf FerretDatasets*.tar.gzDon’t forget to replace “your_windows_username” with your actual Windows username. If you don’t remember the user name type till
mv /mnt/c/Users/and press the Tab key to find the list of Windows usernames.Note: You can access your Windows C drive from Ubuntu by navigating to the path /mnt/c and D drive at /mnt/d and so on. See here for details on file access.
- Step 4: Get the full path to FerretDatasets directory using the command
readlink -f FerretDatasets-7.4and note it down somewhere. You will need it in the next step. (if you have a different dataset version, replace FerretDatasets directory name accordingly) -
Step 5: Change to Ferret’s main directory and start the installation using the commands below:
# change to ferret's main directory cd Ferret**-64 # start the install process ./bin/Finstall - The series of options to be selected are given below:
- press
2and thenEnter - press
.and thenEnter - type the FerretDatasets path you noted in Step 4 and press
Enter - press
.and thenEnter - press
sand thenEnter - finally press
3and thenEnterto finish and quit installation - issue the command
source ferret_paths
- press
- That’s it! Check if Ferret is working using the command ./bin/ferret
- If everything went right you should see your prompt change to
yes?on the left hand side of your terminal. -
If you get errors like
error while loading shared libraries: libreadline.so.6, orerror while loading shared libraries: libhistory.so.6, then it is most likely because the library files you have is of different version (like libhistory.so.7 or libreadline.so.7). You can solve this error by linking the library you have to the one which Ferret is expecting. As an example, lets say you goterror while loading shared libraries: libreadline.so.6, so you have to do# you can check the library path by using "locate libreadline" command # For Ubuntu on Windows the path is /lib/x86_64-linux-gnu cd /lib/x86_64-linux-gnu sudo ln -sf libreadline.so.7 libreadline.so.6 # come back to the directory you started cd -check if error is fixed by running ferret again using
./bin/ferret. If a similar error but with different library name appears, repeat the above fix with this new library name. -
You can remove the
tar.gzfiles you downloaded from the ferret directory directory using the following commandsrm Ferret-*-RHEL7-64.tar.gz rm FerretDatasets*.tar.gz -
To be able to open Ferret from any folder, place a link to ferret in /usr/local/bin using the following command
cd /usr/local/bin
sudo ln -sf ~/ferret/Ferret-*-RHEL7-64/bin/ferret ferret
Add the line
source ~/ferret/Ferret-*-RHEL7-64/ferret_pathsto your bashrc using vi or vim. If you are not familiar with vi/vim, follow the exact same key combinations as below (remember: if you mess up at anypoint, hold downshiftand press z followed by q without releasingshiftand retry)- type
vi ~/.bashrcin your Ubuntu terminal and then press the keysshift+g, then presso, then typesource ~/ferret/Ferret-*-RHEL7-64/ferret_pathsas it is and pressesckey and finally hold downshiftkey and pressztwice. Phew! you are out of vi and your settings have been saved.
- type
Though Ferret is installed and working, the program won’t be able to display
anything until a couple of more steps. Right now, Ubuntu can’t spawn any graphical
window of its own. You need to install an X server in Windows to serve as an output screen for Ubuntu.
So, go ahead and install Xming X
server in windows by downloading and running the exe as you would with any other
windows software. Once installed, it will launch by default. Mimimize it to
system tray so that it keeps running in the background (it’s very light on
resource, so consider adding it to your startup applications to avoid the
hassle of opening it everytime you start Ubuntu). Try the command go basemap
in ferret to check whether display is working. If not, add the line export
DISPLAY=:0 to your .bashrc (at the mercy of vi again)
If you made this far, give yourself a pat on the shoulder. It’s all done, happy ferreting.
Bonus
For the folks prefering high quality and premium control of display graphics, try pyferret instead (it is more than just a visual upgrade). It looks and feels the same as Ferret and all your old scripts will still work. Steps to install remain more or less the same as before, expect a few addition steps to install python dependencies. Or by far the easiest method of all, just install it as a conda package right after you set WSL (see this)


Leave a comment